

How to Handle a Leaking Balcony Without Removing Tiles
A leaking balcony can be a homeowner’s nightmare, causing water damage, structural issues, and potentially leading to costly repairs. While many people assume that fixing a leaking balcony means removing the existing tiles, this isn’t always necessary. In this comprehensive guide, we’ll explore effective methods to address balcony leaks without the hassle and expense of tile removal.
Understanding the Common Causes of Balcony Leaks
Before diving into solutions, it’s crucial to identify the underlying causes of balcony leaks. This knowledge will help you make an informed decision on the most suitable repair method. Here are some common reasons why balconies may develop leaks:
1. Grout and Sealant Deterioration
Over time, the grout and sealant between the tiles can wear down, allowing water to penetrate the balcony’s surface. This is one of the most frequent causes of leaks in tiled balconies.
2. Poor Waterproofing
Insufficient waterproofing during the balcony’s construction can lead to leaks. If the waterproofing membrane is damaged or improperly installed, water can seep through and damage the substrate.
3. Structural Issues
Sometimes, balcony leaks are a result of structural problems, such as cracks in the concrete or a compromised balcony slope that doesn’t allow proper water drainage.
Now that you understand the potential causes, let’s explore ways to address a leaking balcony without removing the tiles.
Sealing the Grout and Sealant
If the grout and sealant between your balcony tiles are deteriorating, resealing them can be a cost-effective solution. Follow these steps:
1. Clean the Surface
Start by thoroughly cleaning the balcony’s surface. Remove any dirt, debris, or loose grout. A pressure washer or a stiff brush can be helpful in this process.
2. Remove Old Grout and Sealant
Carefully remove any remaining old grout and sealant using a grout saw or a utility knife. Be cautious not to damage the tiles in the process.
3. Apply New Grout and Sealant
Select a high-quality grout and sealant suitable for outdoor use. Apply the new grout and sealant according to the manufacturer’s instructions. Pay special attention to the edges and corners where leaks are most likely to occur.
4. Allow to Cure
Let the grout and sealant cure for the recommended time, typically 24-48 hours, before exposing it to moisture.
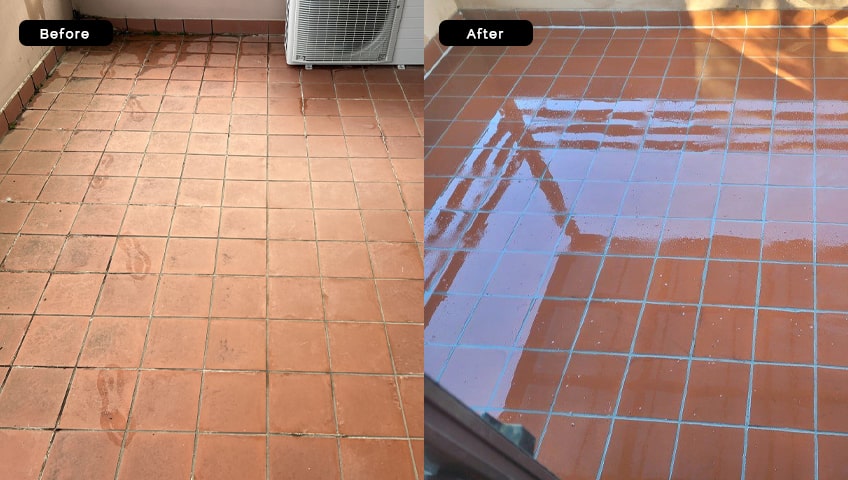
Waterproofing the Balcony
If the root cause of your balcony leak is poor waterproofing, addressing this issue is essential. Here’s how you can do it without removing the tiles:
1. Surface Preparation
Clean the balcony surface as mentioned earlier to ensure proper adhesion of the waterproofing material.
2. Apply Liquid Membrane
Choose a liquid waterproofing membrane suitable for balconies. Apply it evenly across the entire surface, paying extra attention to seams, edges, and any potential weak points.
3. Reinforce with Fabric Tape
For added protection, consider using fabric tape or reinforcement over seams and joints in the membrane. This provides extra durability against potential leaks.
4. Allow to Dry
Follow the manufacturer’s recommendations for drying time. Typically, this process may take a day or two, depending on weather conditions.
Addressing Structural Issues
When structural problems are at the root of your balcony leaks, it’s essential to address them promptly to prevent further damage. However, this can be a more extensive and costly repair. Consider these steps:
1. Structural Assessment
Consult with a structural engineer or a professional contractor to assess the extent of the damage. They will provide recommendations on how to repair the structural issues.
2. Repair the Structure
Follow the recommendations from the structural engineer to repair any cracks, reinforce the balcony’s structure, or correct drainage issues.
3. Apply Waterproofing Solution
Once the structural issues are resolved, apply a waterproofing solution as mentioned in the previous section to ensure long-term protection against leaks.
Regular Maintenance
Prevention is the best way to avoid future balcony leaks. After addressing the current issue, establish a routine maintenance schedule. This should include regular inspections, cleaning, and resealing of grout and sealant as needed.
Conclusion
Dealing with a leaking balcony doesn’t always necessitate the costly and time-consuming removal of tiles. By identifying the root cause of the problem and choosing the appropriate solution, you can effectively handle balcony leaks while preserving your existing tiles. Whether it’s resealing grout, waterproofing the surface, or addressing structural issues, taking proactive measures will ensure your balcony remains a functional and enjoyable space for years to come. Don’t let leaks ruin your balcony; take action today and enjoy a leak-free outdoor space.